Lighting Effect & Manipulation in Photoshop cs6 | Anigraphik Hindi Tutorial
Lighting Effect & Manipulation in Photoshop cs6 |
Step 1: First of all, you need to cut out a dancer image with the help of pen tool or Magic Selection tool.

Step 2: Create a new file size (1300*700) around, And place a Background image on the Photoshop.

Step 3: Now go to the adjustment select the Black & white option.


Step 4: After that select the Gradient Toll and Select the Black color in Gradient. Now Drag from top to bottom like this.

Step 5: Open model PSD, Drag the model layer.

Step 6: After place, the Model layer, go the custom shapes and select the custom shape which you like. I select this and Drag your screen


Step 7: Convert the shape into Rasterize layer,( right click on the shape layer, you find many options and one of the Rasterize layer ),
when you Rasterize then Press the CTRL Button and hit the mouse on model layer, you will find your model image around will be a selection.
Now select the shape layer which you rasterize before, then select the Eraser and erase the extra shape like this.

Step 8: Do the Duplicate ( CTRL + J For Duplicate layer ) of Shape layer, and Change the Position of the layer.

Step 9: Select the Shape layer to go to the Blending option, hit on the OUTER GLOW.
Blend Mode : Normal
Opacity : 75
Noise : 0
Spread: 0
Size: 155
Same as another layer which you duplicate before. But color change


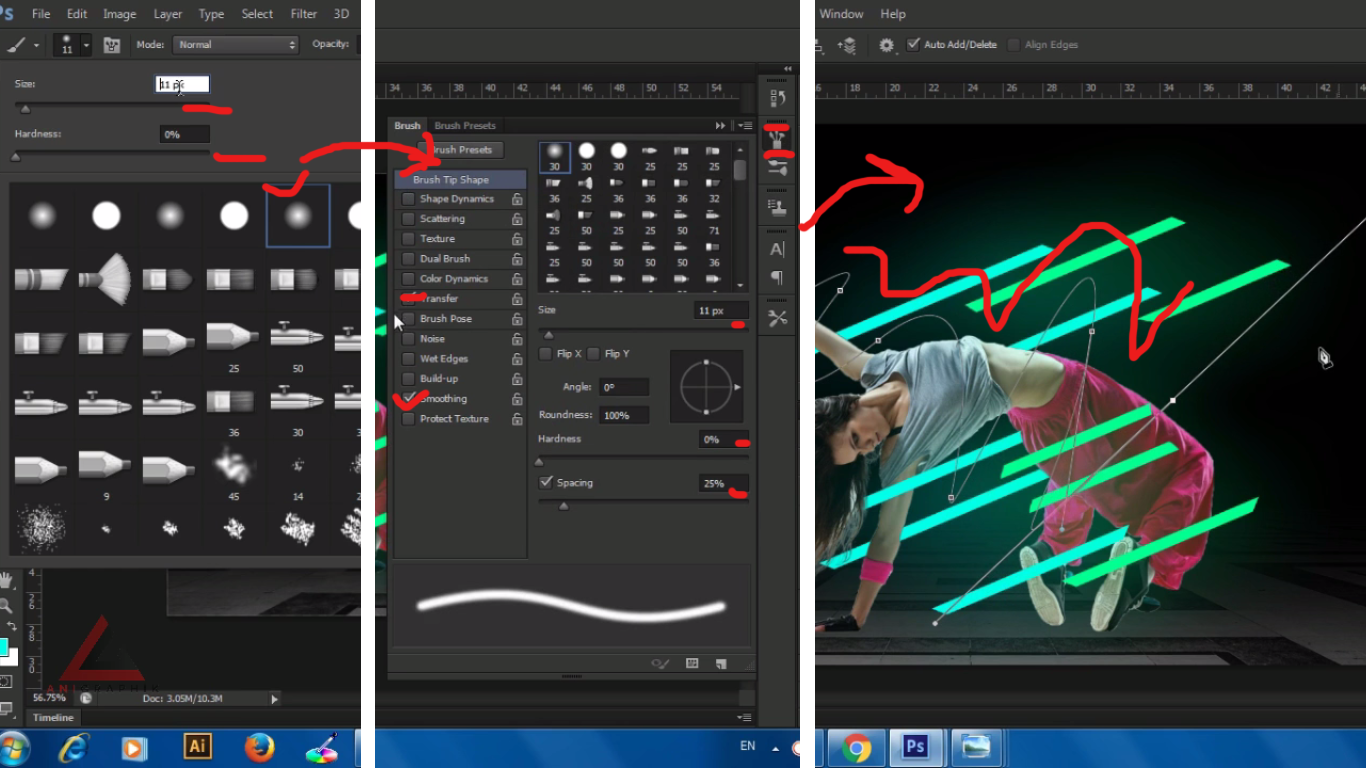
Step 10: Now we Create Ribbon like, First of all, select the Brush tool, select the 5th number Brush, size must be 11-12 px.
Go to the head of Photoshop, hit on the WINDOW, select the Brush option.check the Transfer and Smoothing.
Then select the PEN TOLL and Draw a path model layer.
Everything is Describe in this image
Step 11: After completed the path, right click on the Screen, a window will pop- up, select the Strock path, the select Brush and check the Simulate Pressure. Then Hit okay

Step 12: Again open the Brush, Check on the scattering, Transfer, and Smoothing. Then right click on the screen hit on the stroke path, a window will popup.
select the Brush and check the Simulate Pressure. Hit Okay you will find lots small circle around the Path which you create.

Step 13: Press CTRL and hit on the model layer, you model image will be selected, then select the ribbon layer. after that select the Eraser and erase the ribbon which is overlap on the model image.

Step 14: after erase then select the pen tool and Draw a shape on the Model shoes.

Step 15: When shape completed, Go to the head of You must fill is Closed and open the Border.

Step 16: now go to the Blending mode- hit on the Outer Glow
In Outer Glow:-
Blend mode: Normal
OPacity: 75%
Noise: 0
Spread: 10%
Size: 98
This is done on both shapes.

Step 17: Now select the model layer to go the Adjustment select the Photo Filter and put the Color which you want.

Step 18: Now your Editing is completed. Thank you so much for reading my Blod.Please subscribe our youtube channel.

Feel free to subscribe to my channel:
http://bit.ly/2mJUktP
like our official facebook page:
http://www.facebook.com/anigraphik
Please support us on Patreon: https://www.patreon.com/anigraphik
BLOG: http://anigraphik.blogspot.in/
Devian Art:- http://anilprjapati.deviantart.com
People also like these videos.
Photo manipulation: https://goo.gl/bqFW1e
Change Eyes color: https://goo.gl/Uzi13C
animation tutorial: http://bit.ly/2ms2iM0
Blending option: http://bit.ly/2lxS0Wt
Youtube cover page: http://bit.ly/2mDSxHh
Realistic Painting Effect tutorial: http://bit.ly/2ngJVK5
Smoke Effect in photoshop: http://bit.ly/2mWoahK
Dispersion Effect in photoshop: http://bit.ly/2mWlPDg
Thank you for the continuous support.


Comments
Post a Comment